Sunday, October 6, 2013

Just a Girl and a Card Table

This weekend was a brand new experience for me. 

Normally at vendor fairs or festivals, I'm the one meandering around looking at things, saying how cute things are but not buying too much. It's all about the experience, right? The leisurely walk through the park or building, getting some vendor food and a lemonade shake up, finding that one great buy that you can't get anywhere else. 

Well this weekend, I was on the other side of that experience for the first time. 

A few months back I taught myself to crochet. And once I learned, I just couldn't stop. And now I'm attempting to turn this obsession into a business. Other than making things for myself and my Facebook friends I didn't know what to do with all the things I was making. Seriously, I had hats coming out of my ears.

And then came Jody.

My wonderful friend Jody kept asking me to have a booth at the Spoon River Drive. It's a scenic drive that goes throughout an entire county in multiple towns over the course of two weekends. It's a big a deal around here. It's a don't-plan-to-drive-anywhere-quickly-that-weekend kind of a big deal. But I kept saying no, I didn't have enough stuff, I didn't want to spend too much money on a booth, I have too much on my plate with trying to sell a house and move, etc.

Then she found me a golden deal. A friend that had a double size tent and was willing to share for a small price. So I finally gave in.

If it weren't for the help of multiple friends, especially my awesome friend Heather over at Moreygirl, I seriously would have been a girl with a card table.  But since my awesome friends helped me, I had not only a card table, but a sign with my logo, racks to hang my things from, a tent, stickers with my logo, an order book, shopping bags....the list goes on. And gosh darn it, I almost looked like I knew what I was doing!

Hats, Fingerless Gloves, and Ear Warmers

I'm pretty sure I had everyone fooled. 

Baby hats, Ruffle Purse, and Ear Warmers

So for two days, I was the one sitting in the chair sweating...then wet...then freezing my butt off (Welcome to the Midwest) while smiling politely and hoping someone would buy something and verify that I did know what I was doing.

Chicago Bears and Elmwood Trojan Fingerless Gloves
And they did!

Chevron Scarf, Chevron Cross-body Purse, and Ruffle Purse
Saturday started out incredibly humid. The kind of humid that just makes everything miserable. As the day wore on the humidity broke and along came the downpour of rain. And I mean Down. Pour. Finally the rain went away and the sun peaked out towards the end of the day. On Sunday, it was a brisk 45 degrees at 7:00am and we were freezing. Very different start to the day. Most of the day was ridiculously cold (which turned out to be great for business!) and then in the afternoon the wind picked up and started blowing people's tents over and merchandise off of tables. 

Loving my warm coffee at 7:00am.
Let me say, Thank you Jesus, Jody and Robert Jones (whoever you are). Jesus just gets my thanks for everything, Jody placed us in a spot that had the back of our tent to the wind and rain, and Robert Jones is the one who provided the super fancy/sturdy tent we were using. Because of all this, we somehow stayed dry and all in one piece. Still freezing....but I'll take it.

Football Earflap Hat
I would say over all it was a great first experience being a vendor. Aside from the crazy weather, I sold some cute stuff, took some more orders and got my name out there a little. The part that I enjoyed the most was seeing the reactions of people when they found something they really liked. It makes you feel validated when other people like what you created. It was so fun to see the little kids that loved the Ruffle Purses and the teenagers that liked the school colored gloves. Whether they bought it or not, it was a neat experience. Definitely different than posting a picture and waiting to see if anyone "likes" it, which is all I have been able to do until now. I really enjoy the face-to-face interaction.

 And to top it off, I was able to spend two whole days with a pretty fun family that shared their tent with me (Hi Winberry's!).


One thing I learned, I did not ever stop to think about all the work that goes into these vendor fairs. These people work hard doing their craft, and then have to pack up and drive to the location, unload and set up their tables and tents, and then pray that they will be successful. It's a lot of work and you never know what will happen....but even as I sit here huddled in a blanket still trying to warm back up...I think it's safe to say it's totally worth it.

For more pics of my crochet stuff go to My Facebook Page.

Thank you again to everyone that helped me this weekend. I definitely could NOT have done it without you!


Thursday, October 3, 2013

Apple Spice Granola


It's finally October. The official month of fall. And if you live in the Midwest, you are still wearing shorts and flip flops and debating whether or not to turn the air on.

But despite it being 83 degrees yesterday, I needed something distinctly fall to remind me that yes, it IS October. 

I have multiple recipes lined up to post about, but after making this I had to share immediately. It smells AH-mazing and tastes just the same.

I've been wanting to try new flavors of granola but hadn't gotten around to it yet. And then yesterday while scrolling through Pinterest I found this apple spice granola. Perfect.

Luckily I had (almost) all the ingredients so to the kitchen I went. 


Yes, there are a lot of ingredients. BUT there usually are when you make granola. The thing that I have learned with eating clean is that once you have been doing it for a little while, you usually have everything on hand that you need. I use maple syrup all the time, so I always have a backup. Same with honey and vanilla. You just learn as you go.

I made two additions to this recipe, chia seeds and ground flax seed. Adding these boosts the nutrition aspect. Chia seeds and Quinoa (keen-wa) are both considered super foods and flax seed is just plain good for you. I also switched out the dark brown sugar for honey and molasses, making it a completely clean granola. The original recipe seemed to be for vegans, but since we aren't vegan it was okay to use honey. 

This is made very similar to the Homemade Granola recipe I posted a few months back.

 Mix all of your dry ingredients in a large bowl.

In a medium bowl, mix your wet ingredients. I whisked mine, and I had to whisk them good to get the coconut oil to mix in. You can see in the picture how it's separated from the other ingredients.


Then pour your syrup over the oat mixture and mix well until everything is coated. 

Spread granola over two parchment covered cookie sheets and bake at 325 degrees F. Bake for 45 minutes, stirring every 10 minutes to prevent burning.


Once it is cooked, let is cool for 20 minutes. This helps it get crunchy. The apples stay soft and add moisture to the granola, so this granola doesn't last quite as long as the homemade recipe. But I honestly don't think that will be an issue since this will probably be eaten within days of making it. 

You can eat it with milk or add it to some vanilla yogurt or greek yogurt with some stevia. Or you can just eat it by the handful as a snack. Anyway you eat it, it's delicious!

Apple Spice Granola
  • 3 cups old-fashioned oats
  • 1/2 cup uncooked quinoa
  • 1 cup almonds (whole, slivered, chopped, whatever you prefer)
  • 2 tsp cinnamon
  • 1/4 cup chia seeds
  • 3 Tbsp ground flax seed
  • 1/2 tsp ground nutmeg
  • 1/2 tsp ground cloves
  • 1/8 tsp salt
  •  1 large apple, peeled and diced
  • 1/3 cup melted coconut oil (or vegetable oil)
  • 1 tsp vanilla extract
  • 1/2 cup unsweetened applesauce
  • 1/3 cup pure maple syrup
  • a little less than 1/4 cup honey w/molasses*
  • 3/4 cup raisins
Preheat oven to 325 degrees F. Line two cookie sheets with parchment paper.

In a large bowl mix all of your dry ingredients - oats, quinoa, chia seeds, flax seed, almonds, cinnamon, nutmeg, cloves, and salt. Do not add raisins yet.

In a medium bowl whisk together all of your wet ingredients - oil, vanilla, applesauce, honey w/ molasses, maple syrup.

Pour syrup onto oat mixture and mix until everything is coated. Spread onto cookie sheets and bake for 45 minutes. Stir granola every 10 minutes to avoid burning.

Cool granola for about 20 minutes. Add raisins. Store in air tight container.

*Here's the deal with the honey. What I have read about converting brown sugar to honey is that you want to use a little less honey and then add molasses to finish your measurement. I usually eyeball it. You also want to use less honey than sugar. So if your recipe calls for 1/4 cup sugar, then you use a bit less than 1/4. If you want to get really technical, you can buy a kitchen scale and convert it by weight, but that's too involved for me so I wing it. So far I haven't messed up too badly.
For this recipe I measured out somewhere between 1/8 cup and 1/4 cup of honey and then since the recipe calls for DARK brown sugar, I added a good glob of molasses. It all comes down to taste, so it might be trial and error for you. Let me know if you have any questions about it!

If you want to make this gluten-free you can use gluten-free oats.

Like I said before, if you want it to be clean, use the honey conversion. If clean isn't a concern for you then check out the original recipe for the brown sugar measurement.


 Happy Fall my friends!

Now here's hoping for fall-ish weather coming our way soon!

Tuesday, October 1, 2013

Fiesta Salad


You have no idea what you are in for with this dinner.

Prepare yourself for flavor overload. This dish is called Fiesta Salad and I truly believe it is because eating this is like having a party in your mouth.

Ever still the skeptic when it comes to eating raw veggies, I was iffy about making this. Raw onions, peppers and carrots...I'm not so sure about that.

But it really did sound good so I put my big girl pants on and made it for dinner one night. 

I got this recipe from a friend that gave me a WHOLE bunch of great recipes a while back, and I'm just now getting to making them. She found it out of Oxygen magazine. The website at the bottom of the page was www.oxygenmag.com, in case you want to check it out. 

I was excited to make this because it sounded yummy, but I was still unsure of how I would like the veggies in it...and if I didn't like it, there would be no way the kids would eat it. 

 
Between the brown rice, veggies, and whatever protein you pair this with, it is a whole meal in one. It's packed with nutrients and protein which can be hard to get in the kiddos. 

After you prep all of your veggies, mix your rice, veggies, cranberries, and parsley together in a large bowl.


In a smaller bowl make your sauce. Combine garlic, soy sauce, lemon juice, and olive oil.


Ok, so here is the part when I didn't read every thing fully. (Shocker, I know.) There is a quote on the recipe that says,
 "Chicken, fish, or even eggs, this recipe compliments any protein perfectly."

Well, I took this to mean that you would mix in the chicken, fish, or eggs...like I said, I didn't really read it. Never mind the fact that chicken, fish, or eggs are not listed anywhere on the ingredients list...which should have been my first clue. So my cooking plan was to add chicken. As I was cooking the chicken I re-read the quote and realized that they probably meant that you should pair this salad with chicken, fish or eggs. As in....side dish. Whoops.

Well, now I have chicken on the stove cut up in to small bite size pieces. 
Oh well!
I decided to go ahead with my original plan. I cooked the chicken and cut them up as small as I could. Then when they were fully cooked, I chopped them up even more and mixed them in the salad.


It's up to you if you want to use this as a side dish or if you want to mix in chicken or eggs. I think my mistake turned out pretty good. I'll most likely make it that way every time. 

The last step is to pour your sauce over the salad and mix well.


I tell you what...I haven't been this excited about a recipe in a LONG time. Chad, Olivia, and I all had the same reaction when took our first bite.... "WOW.".

There are so many flavors that you can't concentrate on just one and when you chew, it's like they all just burst in your mouth. 

SO GOOD.

We ALL had seconds of this, and the little that was left got eaten for lunch the next day. It is definitely going into our regular rotation of dinners. Besides the prep of the veggies, it's pretty easy to throw together, which is a huge plus. 


Ok, I won't keep you waiting any longer. Here is the recipe.

Fiesta Salad (with Chicken) 
  • 2 cups cooked brown rice
  • 1 8 oz can of corn, rinsed and drained
  • 1 red pepper, chopped
  • 2-3 green onions, chopped
  • 1/4 dried cranberries
  • 1 carrot, grated or finely chopped
  • 3 tbsp fresh parsley (or 2 tbsp dried parsley)
  • 1 clove garlic, crushed or minced
  • 4 tbsp low-sodium soy sauce
  • 2 tbsp lemon juice
  • 1/2 cup olive oil
  • 1/4 roasted pine nuts or roasted slivered almonds
  • 1/4 roasted sunflower seeds
  • Ground pepper, to taste
In a large bowl combine rice, corn, red pepper, onions, cranberries, carrot, and parsley.

In a separate bowl blend garlic, soy sauce, lemon juice and olive oil.

(Add chicken or eggs to rice mixture)

Pour olive oil mixture over salad to evenly coat. Add roasted nuts, sunflower seeds and black pepper to taste.


Here are some extras from me:
  • If you don't have fresh parsley, use 2 tbsp dried.
  • Don't worry about spending the money on roasted nuts and seeds. I'm sure they taste great, but I didn't have them on hand and they are expensive! So I used plain unsalted sunflower seeds and plain slivered almonds.
  • Again, it's up to you if you want to add the protein to the salad or have it on the side.

These are the things that I did when I made it. I have to watch my costs with cooking and I hate having to buy one random ingredient just for one dish. So I just make do with what I have and hope it works! And then I also don't have half bags of nuts and seeds cluttering up my cabinets.

I hope your family enjoys this as much as mine did!

Monday, September 30, 2013

Chalkboard Picture Project

So now that I've revamped my page and added some new aspects to the blog, I decided to feature a quick re-do project that I did a few weeks ago. This probably isn't really even blog-worthy...but I don't really care. I took pictures for myself and didn't think I'd ever put it on my blog, but I figured why not?

This is extremely simple and really isn't a tutorial, it's just an example of how even as your tastes change throughout the years, you can save some money by re-finishing the things you have. It's also verification that yes, you can paint anything with chalkboard paint.

I was married over five years ago, and boy have my decorating preferences changed! We bought this after we got married from our registry list at Linen's-N-Things...remember that store? 
It was perfect for us and our bedroom decorations at that time.


Now, there are two things wrong with this. One, it's totally cliche. Everyone has "Always Kiss Me Goodnight" in their bedroom. Two, it's not completely accurate....we don't usually go to bed at the same time these days so sometimes the goodnight kiss gets forgotten. 

What to do, what to do....

Chalkboard Paint! 
I had some chalkboard paint left over from painting my pantry door and it was just begging to be used.

I had no clue what I wanted to write yet, but I knew I wanted to paint over it with chalkboard paint. So paint I did.


First I taped the frame with painters tape.

Then I sanded down the picture. It had a bit of texture to it, so I wanted to lessen that. Word to the wise, read the directions before using chalkboard paint. It IS different than regular paint.

Time to paint! I put on a total of three coats of paint and let it dry. 


The directions say you should let it sit for 2-3 days before writing on it. Which was fine with me because I still had no clue what I wanted it to say. I wanted something that had meaning, but was unique, and I couldn't make up my mind, so I hung it on the wall blank.....for four weeks.

It happens.

Finally I came across a Bible verse that I knew would be perfect.

Ta-Da!!
 This verse fits perfect because it's a reminder that God's love will never fail us, and these days we need that reminder. It's also is a good reminder for my husband and I that no matter if we forget to give each other goodnight kisses, our love for each other will also never fail. (I know, I know, too mushy.)

Okay. Honesty time. I cannot tell a lie.

I did not write the arsty lettering. Everyone teases me about there being nothing I can't do. Well here ya go people! I have no confidence what-so-ever in freely handwriting something and it actually looking nice. None. Can't do it. 

Soooooo I recruited my dear mother to do it for me. She's fantastic at all that artsy stuff. I gave her some guidelines for what I wanted it to look like and she put it on the chalkboard. Love you Mom!

I think it looks much better than before, and it didn't cost me a penny.

A little paint can go a long way!

I have more pictures of how paint can change a whole room, but unfortunately they are stuck on the hard drive from our old computer. So I will have to post those at a later date.

Until then, go buy some chalkboard paint and start painting!

Friday, September 27, 2013

Italian Chicken and Red Potatoes


Let me start out by saying this is one of my FAVORITE recipes. It is super easy to make and it tastes amazing.
I got this recipe a long time ago from a dear friend of mine. It's the type of recipe that you really don't even need a recipe card for once you make it a couple of times. And it's a convenient one since you cook your meat and potatoes together. It was a go-to when I was a working mom.
One thing about this recipe, I don't have specific amounts of ingredients for you. It's a drizzle-and-sprinkle recipe. I used to get intimidated by recipes like this because I didn't know exactly how much to use, but now that I've been cooking for a few years I've gotten more comfortable with "a dash of this and a smidge of that" type cooking. It's very freeing!
This recipe isn't necessarily "clean", but it is a healthier dinner option. The only issue being clean is with the oil and vinegar dressing. I looked up online whether that was considered clean or not and I was unable to find a definitive answer. It's not really bad for you, but it is processed and the bottle kind may add extra ingredients that may not be needed, hence not being clean. 
But another friend of mine that is a clean eater said that she uses Newman's Own dressings . If you look at the ingredients they are all whole ingredients. So for my family, I'm completely ok with using it. Like I've said before, I believe that any certain way of eating (clean, paleo, vegan... Hostess Cupcakes diet...) is ultimately up to the person eating it. Everyone has their own reasons for eating a certain way and you have to do what's right for you and your family, and not be judged for it.
So there you have it. Consider it clean or not, either way this chicken dish a great one to add to the dinner rotation.
Other than the chicken and red potatoes, here is what you need:

Italian seasoning, garlic powder, parmesan (or any other cheese you prefer), and olive oil & vinegar dressing.

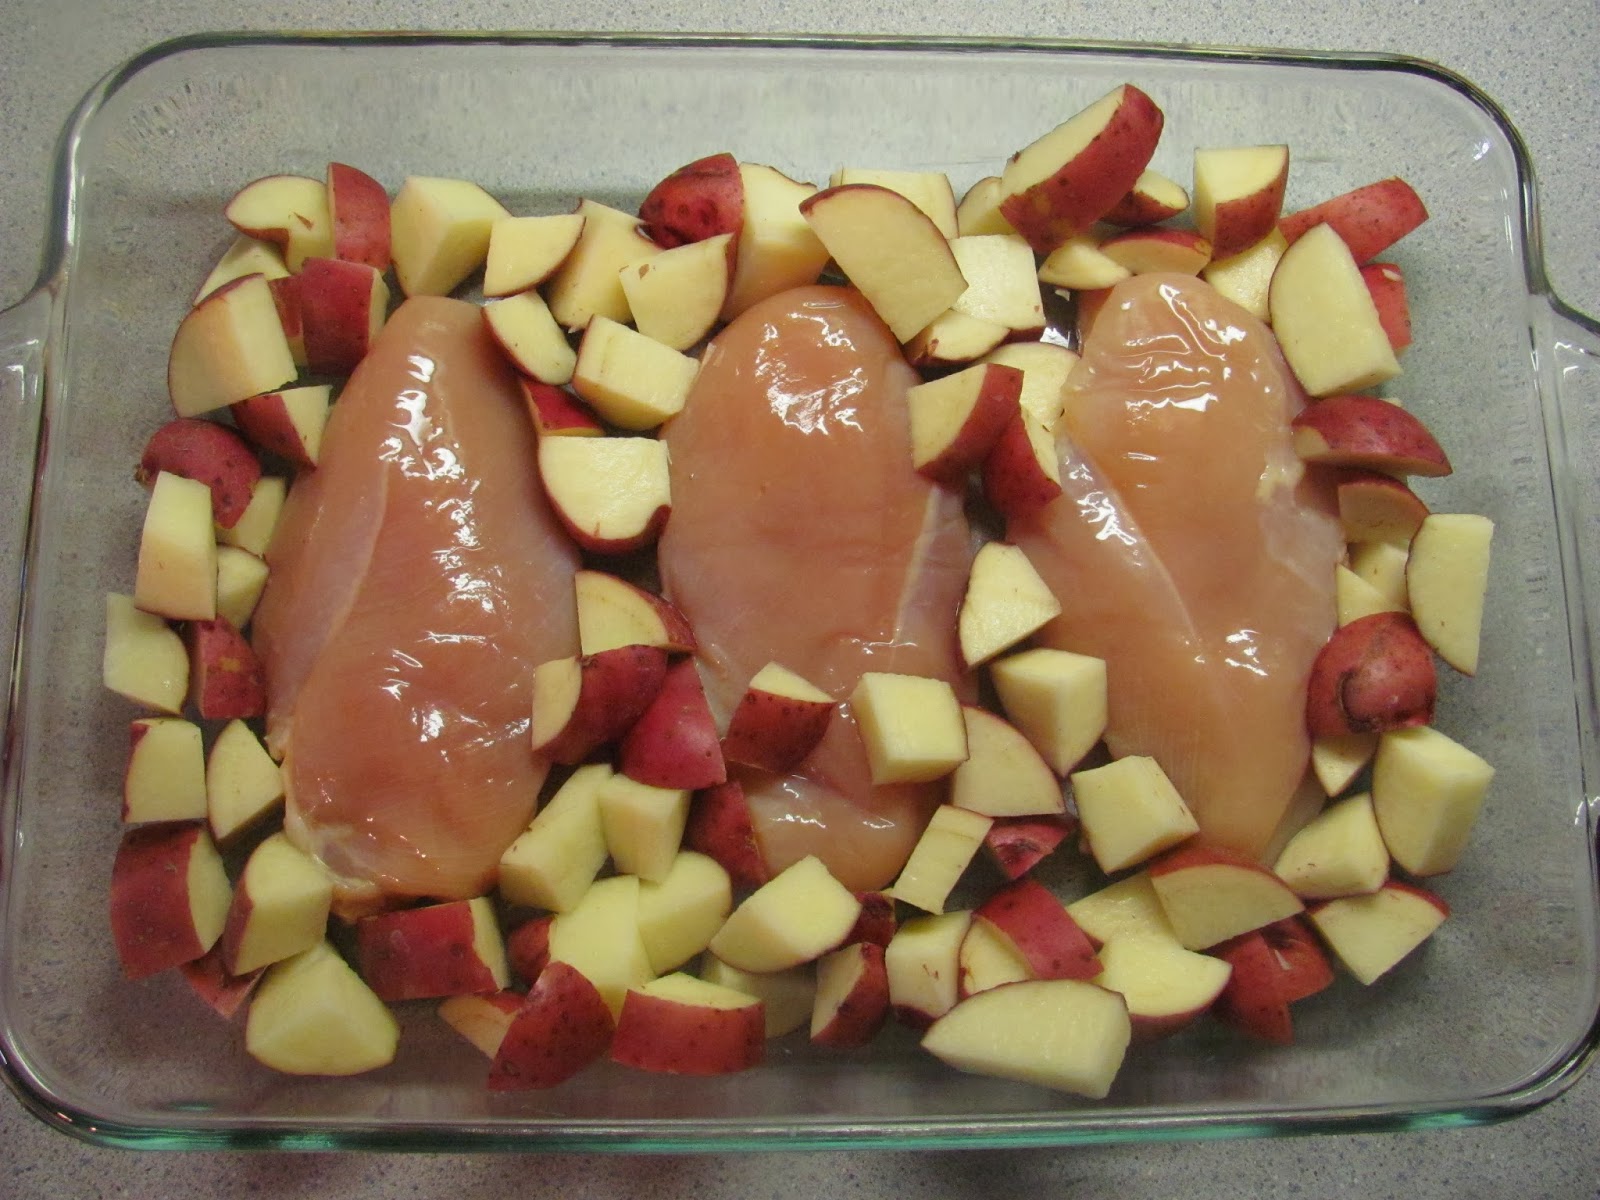
Prepare your chicken and cut up the red potatoes into bite size pieces. Place the chicken breasts in a large baking dish and then place the potatoes all around the chicken.


I usually cook two dishes with this. I cut up extra potatoes and throw them in another baking dish just so we have some extra. They make really good leftovers.

Now for the toppings. Drizzle the oil & vinegar over the chicken and potatoes. Then sprinkle the cheese followed by the Italian seasoning and the garlic powder. Then do one more layer of O&V and another layer of cheese.


Cover with foil and bake in the oven at 400 degrees for 20 minutes. Take out of oven and remove foil. Bake for another 20 minutes or until chicken is fully cooked.

If you want after it has been cooked you can broil it for a few minutes just for it to get brown. I usually skip this step, but it was a part of the original recipe. 


This recipe always comes out delicious and the chicken is juicy and flavorful. My whole family loves it. I've honestly never seen my kids eat their potatoes so fast (at least non-mashed potatoes).

Add some veggies and you have an easy, tasty, well-balanced dinner! Score one for Mom!


Italian Chicken and Red Potatoes
  • 3-4 boneless, skinless chicken breasts
  • 5-6 medium sized potatoes, cut to bite size chunks
  • olive oil & vinegar dressing
  • Italian seasoning
  • garlic powder
  • parmesan cheese, grated
Preheat oven to 400 degrees F.

Place chicken breasts and red potatoes in a 9x13 baking dish.

Drizzle O&V dressing, parmesan cheese, then sprinkle Italian seasoning and garlic powder over chicken and potatoes.

Drizzle O&V dressing and cheese one more time.

Cover with foil and cook in oven for 20 minutes.
Remove foil and cook for another 20 minutes or until chicken cook all the way through.

Optional: Broil for a few minutes until it gets brown.