Wednesday, December 11, 2013

Eggs a Go-Go

Here is another fabulous recipe out of the Mayo Clinic Kids' Cookbook.
Easy and delicious - the best kind of recipe.
 I don't really like the name of it, because I don't get it...but that's the title in the book and the kids think it's cool...which I suppose is the point seeing as how it is a cookbook for kids. Ok, so I guess now I get it.

Because it has lots of eggs and green veggies in it, I feel like this can be served as breakfast or a breakfast-for-dinner meal...which is what I did. I figure it's still fun for the kids to eat breakfast food for dinner and I don't feel guilty feeding them sugary syrup before bed. I don't know about your kids, but mine do not need the extra energy at the end of the day....they have plenty of their own. 

This recipe is also a great way to sneak some veggies in their diet. It has spinach (which is almost tasteless in this), green peppers, and onion. I couldn't believe it when my 3-year-old stabbed a piece of onion with her fork and asked "what's this?". I told her it was onion, she ate it and said "I like onion!". I almost fell off my chair. Even I don't like plain onions. 

The point being, even if they say they don't like something, if you can sneak it in and get them to try it again and again, they may find one day that they do like it. Hey, I figure it's worth a try!

It's ridiculous how easy this is.
All you need is 6 ingredients - eggs, spinach, green pepper, onion, milk, mozzarella.


Throw defrosted and drained spinach in a bowl with chopped green pepper and onion.


Add your eggs, milk, and shredded mozzarella to the bowl and whisk all ingredients together.


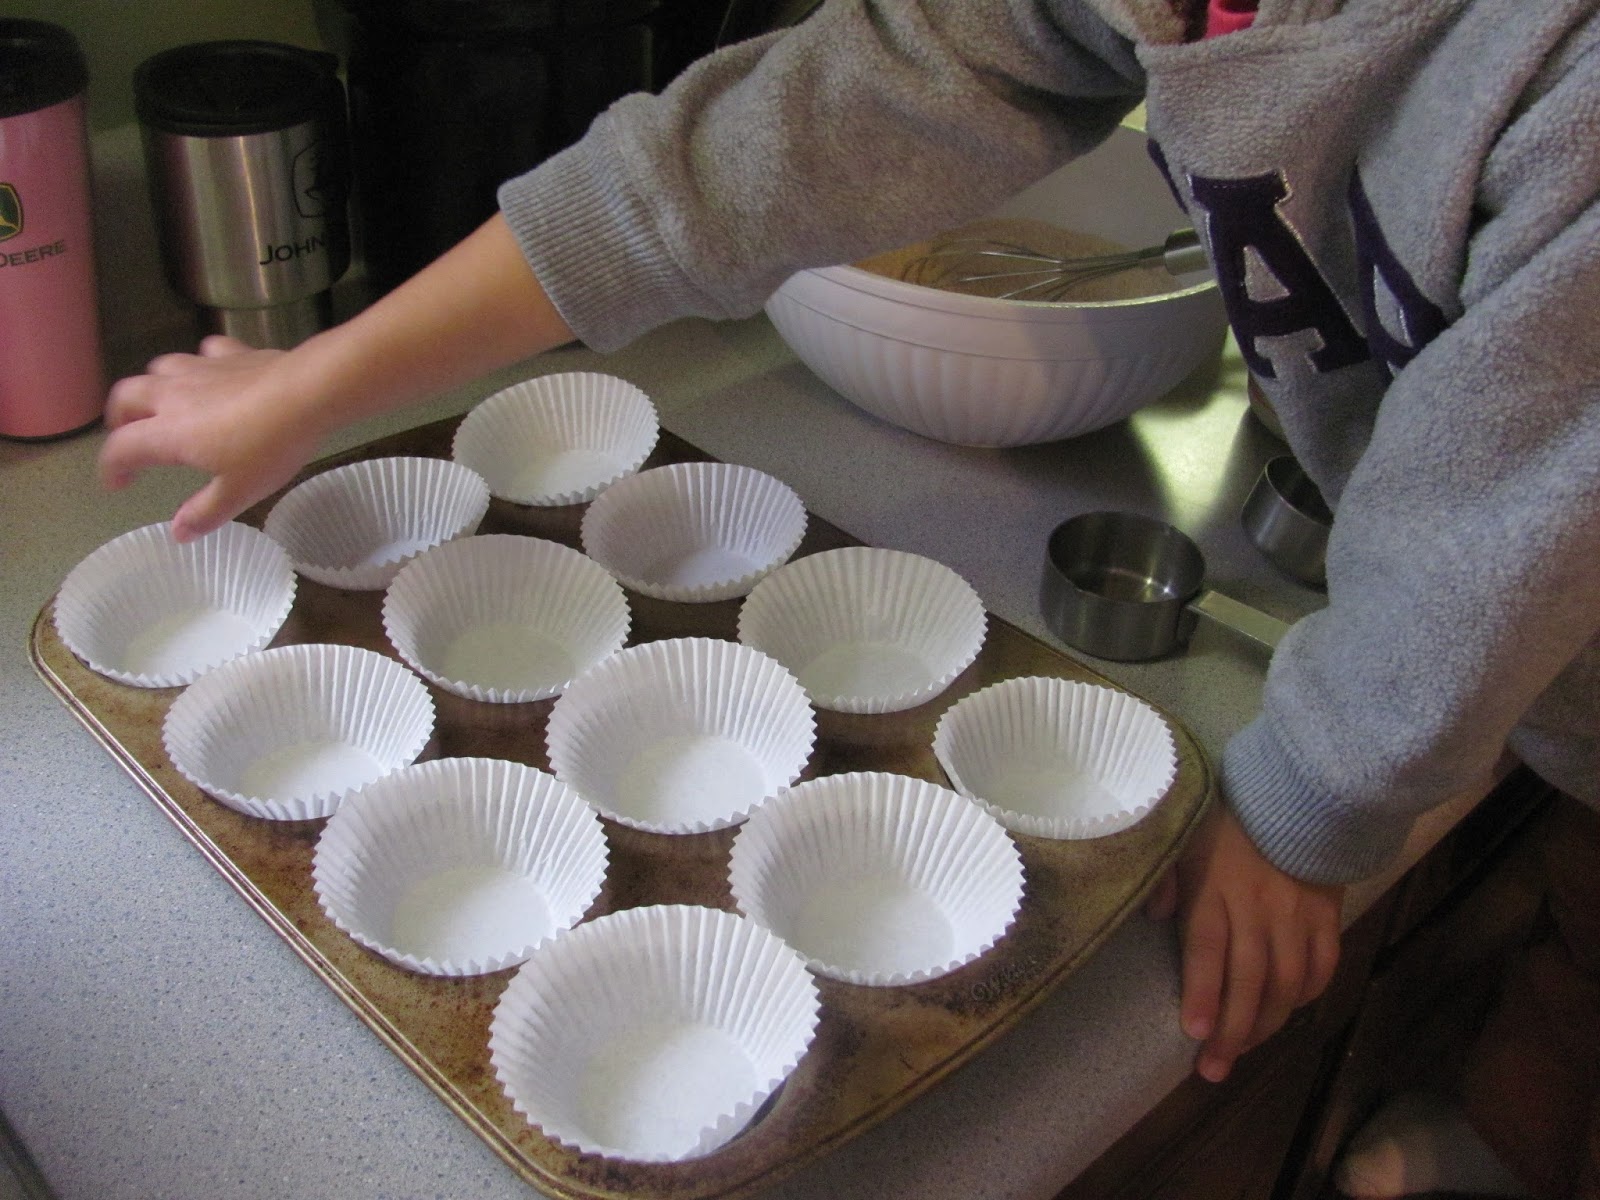
Line a muffin pan with foil muffin cups and coat with cooking spray. 
Pour 1/4 cup egg mixture into each cup.


Bake at 350 degrees F for 20 minutes. 
Insert a knife in the middle of several cups - if it comes out clean then they are done. If not, cook for another 3 minutes and check again.


Oh yeah...that looks GOOD.

Serve with some fruit, toast, juice...whatever breakfast-y foods your family likes! 

I did make a couple changes to the original recipe. The original called for egg substitute....I'm sorry, but yuck. I like real eggs. 
It also called for 16 oz of frozen spinach. I don't know about you, but getting my kids to each veggies is not always the easiest thing. I felt like 16 oz was A LOT of spinach, so I just used one box of Green Giant frozen spinach, which was 9 oz, and that was plenty. 
Lastly, I added milk. I grew up with my mom putting milk in our eggs which makes them fluffier. So I decided to throw some milk in there.

This went over so well with my girls, they both had the leftovers for breakfast the next morning.
Cooking Win!

Eggs a Go-Go
  • 9 oz package of frozen chopped spinach
  • 1/4 cup diced green bell sweet peppers or finely chopped broccoli florets
  • 1/4 cup diced onion
  • 2 cups eggs - I used 9 eggs
  • 1/4 cup milk
  • 3/4 shredded reduced-fat mozzarella cheese
Preheat oven to 350 degrees F. Line muffin tin with foil muffin cups and coat each cup with cooking spray.

Microwave spinach on high for about 2 minutes. Squeeze out excess water.

Put spinach, green pepper, and onion in a large bowl.

Add eggs, milk, and shredded cheese. Whisk ingredients until combined.

Pour 1/4 cup of egg mixture into each muffin cup. If there is leftover mixture, pour it evenly into each cup so they all have the same amount.

Bake for 20 minutes. Insert knife into the middle of several muffins - if nothing sticks and it comes out clean, they are done. If not, bake for another 3 minutes and try again.

Serve when fully cooked.

Wednesday, December 4, 2013

DIY Advent Calendar


This Christmas I'm striving for a little more than usual. 

We currently have our house up for sale and so due to that and the need to acquire a new house when we sell ours, we are keeping Christmas on a smaller budget this year. 

Aside from the smaller budget, I was feeling the desire to get back to basics - the basics of Christmas. Forget the stuff, the deals, the decorations, the food, the stress, the money, the traveling, the craziness....and remember what this holiday is really about - the birth of Jesus Christ. 

We always celebrated Advent when I was young. We had a spiral book that had bible verses and stories in it for each night of advent, and then we would light a candle each week like some churches do. I remember enjoying those nights very much. Sitting around the dining room table, reading about the birth of Jesus and drinking hot chocolate.

In all honesty, I have been a bit of a slacker at Christmas time. We don't get the kids super excited about Santa, we don't do the Elf on a Shelf thing, and I always would remind the kids that we were really celebrating Jesus, but that's kind of where it ended. I went through the motions; focusing on decorating the house, coming up with the perfect gift for each person, and coordinating our schedule so we would see all the family. Of course, Jesus was a part of our holiday every year, but I was failing at making Him the center of it. 

So this is the year for a change. 

Through some very hard trials, I come to the end of this year searching for more, needing more, of Him. And realizing that my children need Him as well. It's not enough to just go to church on Sunday and expect the pastor and Sunday School teachers to teach my kids about God. 
It starts and ends at home.

The buck stops here my friends. 

And so this year I decided to get the Advent tradition going again. I found a list of Bible verses on Pinterest to read leading up to Christmas and thought it would be perfect. The kids were excited about reading the verses, but I wanted them to have the fun of the anticipation of what's coming tomorrow. So I came up with this DIY Advent Calendar.


It took some time to make, but it was pretty simple!

I used foam poster board, Christmas scrapbook paper, red cardstock, double sided tape, stickers, a ruler, and a pencil.


Thanks to Hobby Lobby's 40% off coupon and their continuous sales, the whole thing cost about $15!

I measured the poster board and divided it into 5 rows and 5 columns. And then I measured out a square that would fit in each section. My paper squares measured 3"x4".

 I didn't want to draw any lines on the front of my board so I just eyeballed it when I taped them down. I'm not too much of a perfectionist and I just really wanted to get it done, so I did my best.

I cut slivers of the tape and taped three sides, leaving the top of the square un-taped so I could slip paper inside later. 

For the numbers, I got really lucky! I was planning on buying number stickers to number each day but I found a piece of scrapbook paper that had all the numbers written in really neat ways, so I cut out each number and taped those onto each square. They gave it a completely different look!


Once all the squares and numbers were taped down, I cut up red cardstock paper and wrote a verse on each one. Then I decorated the slips with some fun stickers just to give it a little more surprise for the kids. 


Some of the stickers are Nativity stickers and I put those sporadically throughout all the days....leading up to the 25th when Jesus is born.


To hang it....well...I poked a hole in the back of the foam and hung it on a nail. What can I say? I'm not fancy.

I'm so excited about the calendar. It turned out really cute and fun, and it will be reusable for the years to come. 

But most of all, I'm really excited about doing Advent with my girls. We have done three nights so far and I am already seeing the benefits of doing this. All three nights, 30 minutes before bed, we have sat down together and read the verses for that day. After reading the passage, we go back and look at each verse and I make sure they understand what it means. There has been no TV on before bed like usual, and they haven't missed it so far. (Yay!) Reading these verses together has opened the door to questions that my daughter has never asked before and history she hasn't learned about yet. 

It is only the 4th of December, so it's not too late! If you don't want to make a board, at least let me encourage you to read these verses with your family each night this month.You will be amazed at the things you will learn while trying to teach your children. I promise you won't regret it.

What are some other ways that you have come up with to keep Christ in Christmas?? Please share!

Tuesday, November 19, 2013

Pumpkin Spice Granola


Now that I've discovered there are multiple flavors of granola, I knew I had to make a pumpkin granola. 'Tis the pumpkin season, right?

This recipe is not as overwhelmingly flavorful as the Apple Spice Granola, but it does have a nice subtle pumpkin flavor to it. I prefer my granola crunchy and this recipe is very crunchy. If you ask my daughter however, she was not a fan of the crunch factor. I also enjoyed the walnuts and cranberries instead of almonds and raisins that I put in our regular granola. It was a nice change!

The original recipe was almost perfect, I just had to swap out the brown sugar for the honey/molasses mixture. 

It is made just like the other granola recipes: Mix the dry ingredients in one bowl, and whisk the wet ingredients in another bowl. 


Pour wet mixture over oat mixture and stir until everything is coated. 


Once all the ingredients are mixed, pour out on two parchment paper-lined cookie sheets and bake at 325 degrees for about 40 minutes. 


 Make sure to stir granola every 10 minutes or so, and I also switch the racks so they cook evenly.


Ahhhhh, can't you just smell the pumpkin-y deliciousness??

After granola cools, mix in the cranberries and nuts. The original recipe had pepitas in it because the creator has a nut allergy. Fortunately we do not have any food allergies, so I decided to nix the pepitas and throw in chopped walnuts. SO GOOD. You could really throw in any nut - pecans would be fantastic, too. 

Ok, confession time.

While I was making granola this morning, I was getting irritated because it is time consuming to make all of this clean food when I could easily go out and buy a box of granola. I had a lot of things to do today but if I didn't make granola or muffins, the kids would have to eat eggs for breakfast for the third day in a row. But I had to remind myself that I know exactly what is in this granola and exactly what is going into my family's bodies when they eat it. It honestly did make me feel better. And that can go for anything; eating, discipline, home schooling, etc. There is definitely a sense of accomplishment and satisfaction when you remember the root of why you are raising your family the way you are. 

This also brings me back to the verse I have posted on this blog -

 Colossians 3:23 "Whatever you do, work at it with all of your heart, as working for the Lord, not for men." (NIV)

It made me feel better to think about the good I was doing my kids by making this food for them. But ultimately I need to remember to rejoice in Lord with the things I do and do them with an attitude of working for God; not myself, my husband, or even my kids.

So let me encourage you that when the day gets to be too much, remember why you are doing what you are doing, praise God for the ability to do it, and then ask God for a little help. 
He's listening.


Pumpkin Spice Granola
  • 5 cups rolled oats
  • 1 tsp pumpkin pie spice
  • 1 tsp cinnamon
  • 1/4 tsp nutmeg
  • 3/4 tsp salt
  • 1/2 cup honey w/ molasses
  • 1/2 cup pumpkin puree
  • 1/4 cup unsweetened applesauce
  • 1/4 cup 100% pure maple syrup
  • 1 tsp vanilla
  • 3/4 cup dried cranberries
  • 1/2 cup nuts (walnuts, pecans, etc)
Preheat oven to 325 degrees F. Line two cookie sheets with parchment paper.

Whisk wet ingredients together in medium bowl.

Mix oats and other dry ingredients, minus the cranberries, in a large bowl.

Pour wet mixture over oat mixture and stir until all the oats are coated.

Spread oats over cookie sheets. Bake for 40 minutes - taking out and stirring every 10 minutes.

Let cool. Add cranberries and nuts. Store in air-tight container.

Wednesday, November 13, 2013

How To Cut a Pepper


I saw this on a cooking show a while back. Maybe it's something that you already know, but I didn't so I figure there might be someone out there that would enjoy this kitchen tip.

We eat a lot of peppers these days. I throw the green ones in with cooking a lot of the time and then I recently got the kids eating the sweet peppers for snacks. We love the Dill Dip from Wildtree Herbs. If you want it to be clean then instead of using mayonnaise you can use "vegannaise"- the vegan counterpart. (Don't scoff, it's actually pretty good!) It's a little pricey, but we had previously cut out mayonnaise so by only using it for this dip and the occasional recipe, one jar lasts a long time. Anyway, with some of the Dill Dip, my girls eat veggies like they are candy. Win!

Usually when I cut up peppers, I cut around the stem with a small knife and then try to pull the core out. It works, but it leaves seeds all over the inside and can be messy.

Then I saw this method and when I tried it, it worked wonderfully!


Slice off the top and bottom of the pepper.


Using a small knife, cut around the core separating it from the meat of the pepper.


Pull the core and all of the seeds (hopefully still attached) out of the pepper.


Toss the core and it's time to slice!


Cut in half and then slice or chop away.


That's it! Pretty easy and no seed mess.

Now get some Dill Dip and let your kids go to town.


Monday, November 11, 2013

DIY Laundry Stain Remover


I've been waiting a while to make this stain remover. I still had some of my store bought stuff left so I had to wait until it was all gone and then I obviously wanted to use it and make sure it worked before blogging about it. 

I didn't even mean to post it now. I thought I still had some store stuff left and when I went to do laundry this afternoon, I found out that my dear husband (whom I love so much) had used the last of it and never told me. He also didn't know that I wanted to keep the bottle to re-use, so I had to go digging through the laundry room trash can....have you ever done that before? The laundry room trash? *shudder* Nasty.

BUT I found it, washed it off, and put it to use. All is well with the world and my husband is saved from the dog house. 

Luckily, this recipe is extremely easy to make, so it wasn't a huge inconvenience to have to throw it together in the last minute. I was able to whip it up, spray it on, throw the laundry in and get back to racing my 3-year-old with laundry baskets. 

I found this recipe on My Kitchen Escapades - she mostly has food recipes but she also has some pretty good cleaner recipes.

Here is the link to the original recipe: Homemade Shout.

All you need is ammonia, dish soap, baking soda, and warm water.


This is another great recipe that is easy on your wallet, too. The dish soap was less than a dollar and you use about 2/3 of it. The ammonia is a few bucks, but you barely use any. And baking soda is pretty cheap, too. I've learned to just stay stocked on baking soda, ammonia, and vinegar because I almost always need them for any of my cleaning recipes. 

Mix these three with warm water and pour in your spray bottle.


DIY Laundry Stain Remover
  • 2/3 cup dish soap
  • 2/3 cup ammonia
  • 6 Tbsp baking soda
  • 2 cups warm water
Mix together in medium bowl. Pour into spray bottle. Spray on stain and wash as usual.

Shake up the bottle before spraying on stain due to baking soda settling on the bottom.

DO NOT use on anything washed with chlorine bleach due to the ammonia.


I'm very happy with this recipe!
 It was easy and cheap to make and it got the stain out. Plus, it's one more thing to cross off the list of crap I spend too much money on. 

Next up....internet service....who has a recipe for that???

Monday, November 4, 2013

Lemon-Pecan Pork Chops


Here is a very simple and delicious dinner. Super easy to whip up on a work night or when you have to rush off to practice or a game.

I found this recipe quite a few years ago in a magazine and I jotted it down on a piece of paper. It's been a favorite of mine for a long time. It is technically "clean", however there are varied opinions on whether or not pork is clean. We don't eat it very often, but I don't have a problem eating it once in a while.

The nice thing about this meal is that if you have picky eaters, you can still make it for everyone. I have a family that just can't get over not liking nuts. I've been trying for over a year to sneak them into food - bread, granola, muffins, cookies....no matter what someone always eats it and says "what is this thing?"... "An almond."... "Ew, I don't like this." 
*sigh*

So I can tell you that I love this recipe. My family....love the pork chops...not so much the lemon-pecan part. 
But guess what? I do the cooking! I win!

The other reason I enjoy this recipe is that most of the time when we eat meat for the main course, my husband grills it. So I do like to find a recipe here and there that I can make without him if he's not around to fire up the grill. Yes, I am that girl...I have no idea how to grill. Nor do I care to.

So instead of the grill, let's fire up the skillet.

Prepare the pork chops - I'm super picky about fat on my meat so I try to cut off all that I can. After you have trimmed all the fat, freely sprinkle garlic salt and lemon pepper seasoning on both sides of the pork chops.

 
 Pour about a tablespoon of olive oil (or grapeseed oil) in your skillet and heat on medium. Cook pork chops 8-10 minutes on each side or until the juices run clear.


 Once the pork chops are cooked through, remove them from the skillet, set aside and keep warm.
Pour pecans and lemon juice in skillet and saute pecans for 1-2 minutes or until heated through. Just don't burn them!


Pour pecans on top of pork chops and serve. 

Pair them with some brown rice, cous cous, salad, cooked vegetables...pretty much whatever you want. 

And that's it! Extremely easy and so so yummy!

And if the kiddos (or the husband) don't like the pecans, they can scrape them off and Mom can pile more on hers....not that I speak from experience....


Lemon-Pecan Pork Chops
  • boneless pork chops
  • garlic salt
  • lemon pepper seasoning
  • 1 Tbsp olive oil
  • 1 cup chopped pecans
  • 1/4 cup lemon juice
Sprinkle pork chops with garlic salt and lemon pepper. In a large skillet over medium heat, cook pork chops in olive oil for 8-10 minutes on each side or until juices run clear. Remove and keep warm.

Add the pecans and lemon juice to the skillet; saute for 1-2 minutes or until heated through. Spoon over pork chops.

Saturday, November 2, 2013

DIY Photo Board


A few months ago I redecorated my daughter's room. She is almost 9 and so we are in the stage of keeping everything she has ever owned and hoarding it under her bed or in her closet. She also has a habit of taping pictures to the walls. So once the new paint went up, I made the decree that the taping had to stop. I spent two day painting these walls....they are MY walls now.

So I came up with this. It's the same concept as the Fabric Covered Bulletin Board. But instead of having cork board under the fabric to pin things to I wanted to make a way to hang the pictures on the board without putting holes in them.

Of course when I did her room I had all kinds of grand plans of DIY projects that I could do to decorate....but five months later this is the only one to have actually happened. Such is life!

Here are the supplies I used to make the photo board: plywood, poly foam, hot glue gun and glue sticks, staple gun, fabric, decorative buttons, mini clothespins, and yarn.


Obviously, you can let your creative juices flow with this: make it any size, use whatever fabric or buttons you want, hang the pictures in any direction. You could get a more muted fabric and use your buttons for the decoration, you could paint the clothespins different colors, there are endless options.

For Olivia's room....being the awesome mom that I am....I relinquished creative control and let her pick out the fabric. Hence the hot pink-lime green-zebra print fabric. Did I try to persuade her to pick out something a little less....bold? Of course.

"That one is great honey, really, it is.... but what about this one?"
"NO! I want THIS one Mom! I love this one."

So pink/green/zebra print it is.

First thing's first, you want to make sure to drill your holes in the plywood so you can hang it. I forgot to do that so in all honesty, this thing sat finished on the floor for weeks until I finally had my husband drill some holes so I could hang it.

I decided to use some poly foam to pad the board. You don't have to do this, I just want it to have a softer, cushier feel to it instead of being a big hard piece of wood.

If you choose to use the foam, cut it to fit your wood.


Use a hot glue gun to glue the foam to the board. First I tried to squeeze the glue all over the board and then place the foam on top, but the glue dried too quickly so the foam wasn't sticking. So I ended up gluing a little bit at a time and that worked out quite nicely.


Once the foam is glued on and dried, place the board (foam side down) on the back side of your fabric. Make sure if your fabric has a pattern on it, that you check the direction of your pattern. For mine, I wanted the lines going vertical instead of horizontal. Cut your fabric leaving several inches extra around all sides.


Now grab the staple gun and let's have some fun.

Fold your corners in first and staple right on the fold. I stapled the short sides first and then did the long sides. Make sure you pull the fabric tight while stapling.

 
Stagger the staples all around the fabric to ensure that it doesn't pull in all the same places.


Flip your board over and get the glue gun, yarn, and buttons.

This is another place where you can get creative. I decided to do a zig-zag pattern for this board. I tried to space the zig-zags far enough apart so she could hang different sized pictures. You could do horizontal lines or vertical lines or even diagonal lines. However you want to hang your pictures!

Once you have decided where you want to place your yarn, hot glue the buttons on the ends of the yarn to hold it in place. This keeps the yarn attached and adds some fun decoration at the same time!


Make sure to test the tension of the yarn as you are gluing. Yarn stretches so if you don't want the pictures to sag then pull your yarn tighter. If you want some slack then leave the yarn a little looser. 

Now clip the clothespins where ever you want them. I thought about gluing them in place, as well, but decided against it. There is more flexibility if they aren't glued.


And that's it! Grab some pictures and start hanging! 


I'm really happy with how this turned out. Despite the loud fabric, it fits Olivia's room perfectly. We are very into animal prints these days so this fits right in. 

She has a lot of fun switching the pictures around and putting up different things. And most of the time it keeps the papers off of the floor and the wall! Most of the time.....


Thursday, October 24, 2013

Clean Pumpkin Muffins


 October is upon us. 

Ok let's be real. It's the 24th of October, so the month is almost over already. So today I had the "Oh crap I better get my pumpkin post up before the month is over" anxiety.

Does anyone else feel like every year just goes by faster and faster? I'm not liking this!

Seeing as how October is the unofficial month of pumpkin-flavored everything, I had to make something with pumpkin. 

I found a few great recipes using pumpkin, but decided to start with the most basic one...muffins.

After having a weirdly warm fall, the last couple weeks have started to get cooler. We even had a chance of snow the other day. Go figure...only in the Midwest you will go from T-shirts to snow pants in the course of two weeks. So with the weather getting cooler and me being stingy and not wanting to turn on the heat, I decided it was time to bake!  

As with most baking recipes, whisk together the dry ingredients in a medium bowl. The original recipe called for half white flour and half wheat flour, but I changed it to half Whole Wheat Pastry flour and half White Whole Wheat flour.


Then whisk together the pumpkin and other wet ingredients. 


In this part I changed the canola oil to grapeseed oil. You can also use olive oil. I discovered grapeseed oil when I learned about Wildtree - a food company that sells whole foods with no extra ingredients. It's like a Tastefully Simple but with out all the preservatives and extra stuff. I absolutely love this stuff! You should check it out!

I also used almond milk instead of cow's milk, not necessary but just a preference. 

The original recipe had raisins in it...and while I like raisins....I like chocolate more. So I switched those up for mini chocolate chips. 

Line your muffin tins with paper cups or you can bake these using a silicone muffin tray (I want one so bad!).
Don't mind my little helper's hands in the picture....she insisted on doing the muffins cups. :)


Combine your wet and dry ingredients. 
Then fold in your added ingredients, in this case chocolate chips and slivered almonds.


WARNING: DO NOT LICK THE BATTER.
Once you lick it, you will not be able to stop!
This recipe made about 16 muffins and I'm pretty sure it was supposed to make 18....but I may or may not have eaten two muffins worth of batter. 
SO PLEASE HEED MY WARNING.

After restraining yourself from eating all of the batter...pour batter into muffin cups. I usually use my 1/4 measuring cup when making muffins, but the blogger that made this recipe used an ice cream scoop. I tried the ice cream scoop this time and it was great! One big scoop was plenty for each cup.


Bake in the oven at 350 degrees F for 20-25 minutes or until a toothpick comes out clean.

Let cool for 10 minutes.

I found the original recipe over at Sweet and Crumbly and she called them Bet You a Million Bucks Pumpkin Muffins.

That title was a little long for me, so I just call them Clean Pumpkin Muffins because with the small changes I made they are truly clean. 

Geni at Sweet and Cumbly recommended eating these with coffee...so I took her up on her advice...and she was right! I had two muffins with my ritual early morning cup of coffee and it was a perfect breakfast.

And since I like to keep it real around here...this is what my life really looks like in the morning. 


No perfect mom here! Just a happy one.


Clean Pumpkin Muffins
  • 3/4 cup whole wheat pastry flour
  • 3/4 cup white whole wheat flour
  • 1 tsp baking soda
  • 1 tsp baking powder
  • 1/2 tsp salt
  • 2 tsp ground cinnamon
  • 1 tsp ground ginger
  • 1 tsp ground nutmeg
  • 1/4 cup molasses
  • 2 Tbsp maple syrup
  • 1/3 cup plain greek yogurt (non-fat)
  • 1/4 cup olive oil (or grapeseed oil)
  • 3/4 of 15oz. can pumpkin puree (not pumpkin pie spiced)
  • 1/4 cup almond milk
  • 2 eggs
  • 1/2 cup chopped almonds (optional)
  • 1/2 cup grain-sweetened chocolate chips (optional)
Preheat oven to 350 degrees F. Line muffin tin with muffin liners.

In a large bowl whisk together the dry ingredients - flours, baking soda, baking powder, cinnamon, salt, ginger, and nutmeg.

In another bowl whisk together the wet ingredients - molasses, maple syrup, greek yogurt, oil, pumpkin puree, almond milk, and eggs.

Slowly mix dry ingredients into wet and combine just until dissolved.

Fold in your optional ingredients - chocolate chips, almonds, raisins, etc.

Fill muffin cups 2/3 full and bake for 20-25 minutes or until toothpick comes out clean.

Cool for 10 minutes. Store in air tight container in cabinet or refrigerator.